Drop Down MenusCSS Drop Down MenuPure CSS Dropdown Menu

Thursday, August 7, 2014

CREATIVE NEWSPAPER HOLDER

CREATIVE AND VERY EASY NEWSPAPER HOLDER ON YOUR WALL 

NEWS PAPER HOLDER...

Here we will see how to make a creative newspaper holder for your beautiful wall for this holder following steps are involved.


Step 1 :- Take 4-5 plastic bottles and cut all the bottles from above the half of the bottles.


Step 2 :- Now press the bottle against hot iron to smooth the cut side of the bottle.


Step 3 :- Now take a piece of cardboard and cover it completely with white paper and then fix all the bottles on the cardboard from the base and then either fix or hang the cardboard on the wall .

Step 4 :- If you want it to be more attractive then you can apply color tapes on the corner of the bottle or cut sides of the bottle.

FINALLY YOU MAY HAVE A CHEAP AND STYLISH PAPER HOLDER 

           <3 <3 .... your feedback are important for me .... <3 <3

Wednesday, August 6, 2014

CREATIVE HANGING PLANTS WITH PLASTIC BOTTLES

CREATIVE HANGING PLANTS WITH YOUR WALL AND LOOK GREAT.
 
CREATIVE AND VERY BEAUTIFUL HANGING PLANTS ON YOUR WALL...

Here we will see the steps of making this hanging plants with your wall and we can hang multiple plants with the same thread with your wall and all this look great.
Lets see the various steps involved in making it.


Step 1:- Take a plastic bottle and cut it as shown in the picture, for cutting the plastic you may take a knife and to smooth the cut area you may use the hot iron.

Step 2 :- Now fit the two screws on the other side of the bottle, first screw little below the top of the bottle and second screw little up the bottom.


Step 3 :- Now tide the two separate threads on both the screws and you may hang it anywhere on the wall or in the garden.Like this your may tide multiple hanging plants.


SO NOW FINALLY YOU HAVE VERY CREATIVE BEAUTIFUL CHEAP EASY HANGING PLANTS

        <3 <3 .... your feedback is very important .... <3 <3

VERY CREATIVE POUCH WITH PLASTIC BOTTLES

VERY CREATIVE STYLISH BEAUTIFUL AND EASY POUCH WITH PLASTIC BOTTLE

CREATIVE POUCH FROM WASTE BOTTLE 

Here we will see the various steps to build a creative and very attractive pouch from the two plastic bottles. Lets see the various steps involved in the procedure.


Step 1 :- Take two plastic bottles and cut both the bottles from little up of the bottom as shown in the picture.So that we can have two bases of the plastic bottles.


Step 3 :- Now make the holes in the top of the both the bases to stitch the zipper as shown in the figure, for doing these holes you may use hot needle. Be careful do the same number of holes in both the bases. For this purpose you may use the marked paper strip also. 

like this draw this figure on the paper with marking and with its help your may do the holes on both the bottle bases on proper dimensions and equal in numbers.


step 4 :- Now stitch the zipper by joining the open mouth of both the bases together.


FINALLY YOU WILL GET A BEAUTIFUL AND ATTRACTIVE POUCH MADE UP OF TWO WASTE PLASTIC BOTTLES.

YOU MAY ALSO TRY TRY OTHER DESIGN ALSO .....


 <3 <3 ... your feedback is very important... <3 <3


CREATIVE SOUP SPOONS FROM WASTE PLASTIC BOTTLES


VERY EASY AND CREATIVE SOUP SPOONS WITH WASTE PLASTIC BOTTLES

CREATING FOUR SOUP SPOONS WITH A SINGLE PLASTIC BOTTLE

Here we will create four beautiful and very stylish soup spoons from a single plastic bottle. Lets see the easy procedure....


Step 1 :- Mark the sketch with a pen as shown in the figure and cut it accordingly and for more finishing after cutting the marked bottle you can slowly press the sides over a hot iron ( cloth press ). To make the side of the cutting soft and smooth.
Now you are ready with a stylish soup spoon.


ENJOY THE SOUP WITH YOUR OWN SPOON 

          <3 <3 ....your feedback are very important.... <3 <3

Tuesday, August 5, 2014

CREATIVE AIR TIGHT AND ATTRACTIVE JARS WITH WASTE PLASTIC BOTTLES

CREATIVE BEAUTIFUL ATTRACTIVE AND VERY EASY AIR TIGHT JARS FROM WASTE PLASTIC BOTTLES 

TWO BOTTLE TO MAKE ATTRACTIVE AND AIR TIGHT JAR...

Today we will see how we can easily make the beautiful and air tight jar with just two plastic bottles. 
Here are the following steps as shown below ....


Step 1 :- Take two bottles of same size ( 1 liter cold drink bottle ) and cut both of them little below of the middle.


Step 2 :- Now we have two lower portion of bottles.


Step 3 :- Now finally we put any cereals, rice, pulses, sugar, salt any thing and cover first half bottle with another half.


CREATIVE CHANDELIER WITH BICYCLE RIM AND CHAIN

VERY CREATIVE AND AMAZING CHANDELIER WITH BICYCLE CHAIN AND RIM

Chandelier with Bicycle Rim and Chain...

Here we will see how we can design more beautiful and very simple chandelier with a bicycle rim and chain. And we can design very cheap, very creative chandelier with little efforts.Now lets see the step by step procedure to build the chandelier.


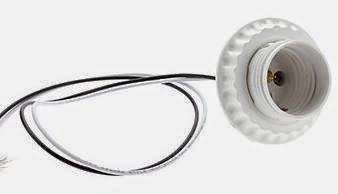
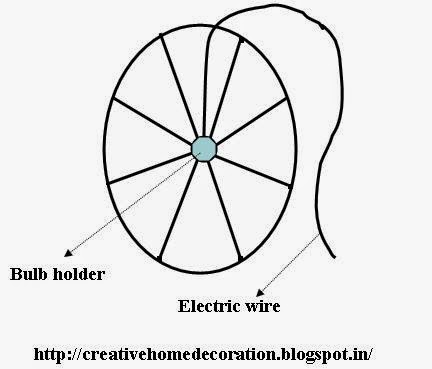
Step 1 :- First we have to do the fitting of bulb in the Bicycle rim, the procedure of this we have already seen in our previous post click here. As here there are four bulbs so we can use the bulb holder with multiple sockets easily available in the market.


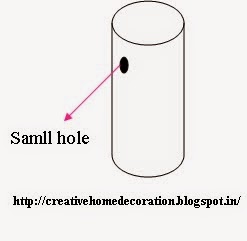
Step 2 :- Now take a 1.5 feet hollow steel pipe of 1.5 inches and fix it on the other side of the rim and pass the cable from the pipe. With the little hole on 0.5 centimeter below the extreme top of the pipe as shown in the figure. 


Step 3 :- Now take a circular thin steel plate with radius of about 5 centimeter or according to you with holes on the outer side of the plate and one hole at little left or close to middle of the plate as shown in the figure, this hole is actually for passing the electric wire.And a hanging hook in the middle of the plate. You can get the hook welded on the plate.


Step 4 :- Now get the plate welded on the other side of the hollow pipe before welding take the electric wire from the hole in the hollow pipe and then hole in the plate and finally get the plate welded.


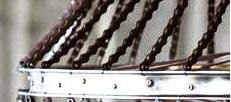
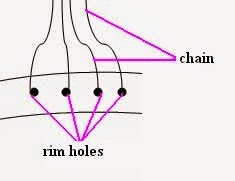
Step 5 :- Now the challenge is to decorate the chandelier with the bicycle chain for this we need a thin and small size aluminum wires pieces to tie the chain with rim holes. 

Now take pieces of the bicycle chain according to your desire. If you are using 1.5 feet hollow pipe then you may take 2 feet chain pieces and these pieces must be equal to the number of holes in the rim.


Now tide the chain pieces with rim holes using the aluminum wires from one end and tide the another end with the steel plated welded on the other side of the hollow pipe as shown in the figure. 


Step 6 :- Now we have to decorate the chandelier from the base so take the chains of various size and start tiding the chain in semi-circular fashion as shown in the figure. 


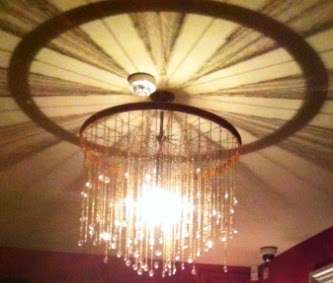
FINALLY WE GET THE BEAUTIFUL AND VERY CHEAP CHANDELIER FOR YOUR BEAUTIFUL HOME ....

                 <3 <3 .....your feedback is very valuable for me .... <3 <3

Saturday, August 2, 2014

SIMPLE BUT CREATIVE CHANDELIER CREATED WITH BICYCLE RIM


SIMPLE AND CREATIVE CHANDELIER CREATED WITH BICYCLE RIM


FIGURE  1.


FIGURE 2.


PROCEDURE TO CREATE THE CHANDELIER OF FIGURE 1. 

Here is the simple chandelier created with bicycle rim it is very easy and simple to make but will look very stylish in your room. What we have actually done is just fitted the half painted electric bulb in between the bicycle rim.

Now lets see step by step procedure to make this beautiful, stylish and easy chandelier with bicycle rim.
 
This is an artistic image of bicycle rim here i want to show you the rod inside the rim, which is an iron/steel solid rod which is use to hold the rim with bicycle.

Step 1 :- Remove the rod from the rim so that we can have a hole inside the rim.


Step 2 :- Now take a hollow small pipe of steel or iron approximately of same length that is of solid rod which you have removed.And weld/paste the pipe in between the hole of the rim from where you have removed the solid steel rod.


Step 3 :- Now pass the wire from the hole and fix the holder on the top of the rim as shown in the figure below.


Fix the electric bulb holder in the top of the bicycle rim.


And finally fix it on the your roof or wall where there is the electric fitting of fan or bulb is provided so that you can easily on of off the chandelier with the already provided electric switches in your home.

                                                                                                                 thanks to my viewer <3 <3


PROCEDURE TO CREATE THE CHANDELIER OF FIGURE 2

Now after doing the work explained above you have to follow the rest of the steps explained below.
 
Step 1 :- Remove the alternate spokes from the bicycle rim.
 
 
Step 2 :- Now take beautiful shining beads and pass it with the nylon transparent thread.
Now you may have threaded beads of various lengths.
Finally tied these threaded beads in the holes in the rim which you get after removing the alternate spokes from the rim.


                                                                                                                  thanks to my viewer <3 <3
                                  
                                    <3 <3 .... your feedback is very valuable for me .... <3 <3